Plasti-Fab
EPS Product Solutions
Advantage ICF System
 More than 1 million Canadians are confronted by a choice between paying a
utility bill and covering the rent. It is a shocking statistic used by Habitat
for Humanity to stress the importance of sustainable housing, and it is a call
to action for the organization’s donors and volunteers who join together to
build affordable homes. Partnering families contrib-ute 500 hours of sweat
equity as their down payments and then enjoy no-interest mortgages.
When Plasti-Fab contributed to a Habitat projects in Owen Sound & Wiarton,
Ontario, it was helping to address the challenges in more ways than one.
It seemed like a natural fit for Plasti-Fab. “Habitat for Humanity does great
work in terms of what they represent to the community,” says Richard
Baumgartner, Plasti-Fab Sales Manager for Ontario and Quebec.
In these ten semi-detached homes, they also save cash each month by enjoying
the ongoing energy savings that come with the use of insulating concrete forms
(ICF). Each 1,000-square-foot living area is enclosed by six-inch Advantage
ICF building block walls and a PlastiSpan Expanded Polystyrene (EPS)
insulation that was incorporated into a radiant floor heating system.
Utility bills now average only $46 per month in the middle of winter, and that
includes the cost to heat water for the radiant heating system.
In contrast, Ontario’s Ministry of Energy and Infrastructure says that it can
cost $1,210 per year – more than $100 per month — to heat a home of similar
size with a natural gas furnace.
These benefits reflect the true meaning of “sustainability,” says Alan
MacDon-ald, director of construction at Habitat for Humanity – Grey Bruce. “We
look at the sustainability of the family to be able to maintain their home,
and that includes operating costs.”
But, the advantages didn’t end there. Many of the members of the Habitat
volunteer crew members have never worked on a construction project in their
lives. These lightweight forms are much easier to handle than traditional
framing materials, and they fit together with ease.
“Putting the blocks together is easy,” MacDonald agrees. “Everybody has
fun doing it.”
It sure made a difference to the homeowners and impressed the judges who
bestowed the 2009 Rio Tinto Alcan Sustainable Homes Programme Award, that
recognizes the most successful Habitat builds in the country. When awarding
the $60,000 prize, judges cited the use of ICF as “one of the most
energy-efficient building strategies available in homebuilding today”.
“It was an incredible shot in the arm,” MacDonald said of the honor,
“and a large portion of that submission was based on the ICF.”
Learn More about the Advantage ICF System® at http://www.advantageicf.com
More than 1 million Canadians are confronted by a choice between paying a
utility bill and covering the rent. It is a shocking statistic used by Habitat
for Humanity to stress the importance of sustainable housing, and it is a call
to action for the organization’s donors and volunteers who join together to
build affordable homes. Partnering families contrib-ute 500 hours of sweat
equity as their down payments and then enjoy no-interest mortgages.
When Plasti-Fab contributed to a Habitat projects in Owen Sound & Wiarton,
Ontario, it was helping to address the challenges in more ways than one.
It seemed like a natural fit for Plasti-Fab. “Habitat for Humanity does great
work in terms of what they represent to the community,” says Richard
Baumgartner, Plasti-Fab Sales Manager for Ontario and Quebec.
In these ten semi-detached homes, they also save cash each month by enjoying
the ongoing energy savings that come with the use of insulating concrete forms
(ICF). Each 1,000-square-foot living area is enclosed by six-inch Advantage
ICF building block walls and a PlastiSpan Expanded Polystyrene (EPS)
insulation that was incorporated into a radiant floor heating system.
Utility bills now average only $46 per month in the middle of winter, and that
includes the cost to heat water for the radiant heating system.
In contrast, Ontario’s Ministry of Energy and Infrastructure says that it can
cost $1,210 per year – more than $100 per month — to heat a home of similar
size with a natural gas furnace.
These benefits reflect the true meaning of “sustainability,” says Alan
MacDon-ald, director of construction at Habitat for Humanity – Grey Bruce. “We
look at the sustainability of the family to be able to maintain their home,
and that includes operating costs.”
But, the advantages didn’t end there. Many of the members of the Habitat
volunteer crew members have never worked on a construction project in their
lives. These lightweight forms are much easier to handle than traditional
framing materials, and they fit together with ease.
“Putting the blocks together is easy,” MacDonald agrees. “Everybody has
fun doing it.”
It sure made a difference to the homeowners and impressed the judges who
bestowed the 2009 Rio Tinto Alcan Sustainable Homes Programme Award, that
recognizes the most successful Habitat builds in the country. When awarding
the $60,000 prize, judges cited the use of ICF as “one of the most
energy-efficient building strategies available in homebuilding today”.
“It was an incredible shot in the arm,” MacDonald said of the honor,
“and a large portion of that submission was based on the ICF.”
Learn More about the Advantage ICF System® at http://www.advantageicf.com


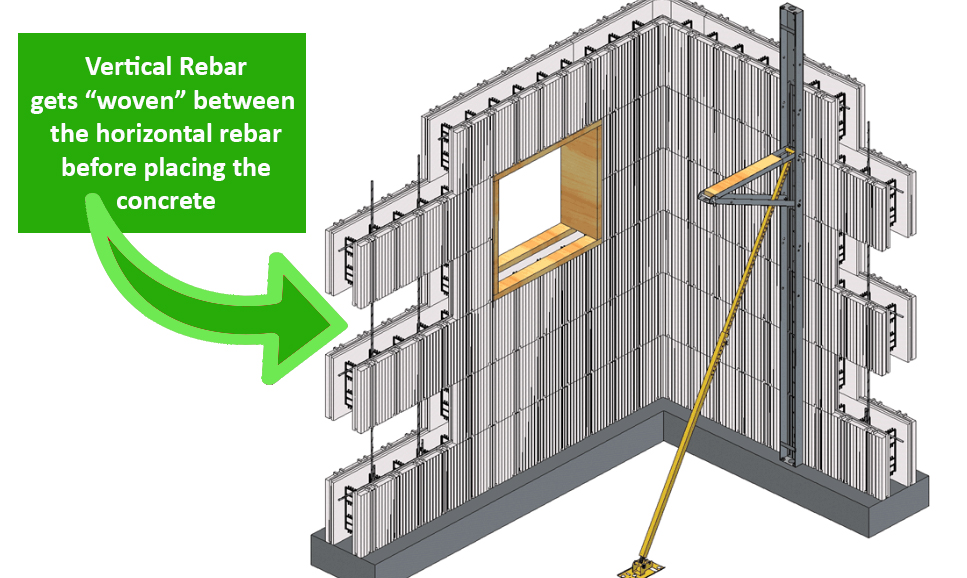
Job site tips for rebar
- Make sure you know where on the job site you want the rebar unloaded.
- Keep the rebar as clean as possible from dirt and other contamination as this will affect the performance
- Cut 4 foot lengths and pre-bend them for corners and T-Walls
- Have a proper rebar cutter and bender on site or arrange to have this done for you prior to having the rebar delivered to achieve required tolerances.
- Place plastic caps over the top of vertical rebar sticking out of footings or walls to prevent injury from sharp ends.
Resources
Advantage ICF Technical Manual Advantage ICF Installation Manual Advantage ICF Detail Manual Advantage ICF System Checklist Advantage ICF Field Guide If you have any questions about the rebar placement for your project, call us today at (888) 446-5377.


 Living in Canada, a question I frequently get asked is “how cold of temperatures can I pour concrete into ICF blocks?”
Concrete construction during cold weather conditions requires special consideration to ensure that the concrete achieves the desired strength prior to freezing. Conventional concrete form walls can be constructed in all seasons; however, during cold weather months special measures must be taken to prevent the concrete from freezing. The special measures may include the use of windbreaks, insulated form work and/or heaters. These extra measures can greatly increase construction costs.
And now for the good news! Advantage Insulated Concrete Forms (ICF) offer the ability to pour concrete into your walls at temperatures colder than that of conventional concrete forms due to their high insulating properties. This ability can drastically extend your construction season, possibly allowing you to pour all year round. In very cold weather conditions, minimal precautions may be required, especially at wall penetrations and edges.
Living in Canada, a question I frequently get asked is “how cold of temperatures can I pour concrete into ICF blocks?”
Concrete construction during cold weather conditions requires special consideration to ensure that the concrete achieves the desired strength prior to freezing. Conventional concrete form walls can be constructed in all seasons; however, during cold weather months special measures must be taken to prevent the concrete from freezing. The special measures may include the use of windbreaks, insulated form work and/or heaters. These extra measures can greatly increase construction costs.
And now for the good news! Advantage Insulated Concrete Forms (ICF) offer the ability to pour concrete into your walls at temperatures colder than that of conventional concrete forms due to their high insulating properties. This ability can drastically extend your construction season, possibly allowing you to pour all year round. In very cold weather conditions, minimal precautions may be required, especially at wall penetrations and edges.
 Many studies have been done on this topic and they have all concluded basically that concrete can be placed in ICF walls at temperatures much lower than that allowed for concrete walls using conventional forming systems.
Unfortunately I cannot give exact temperatures because people reading this may be in different climates around the world. However, I can say that using Advantage ICF blocks instead of conventional will prevent freezing and reduce or even eliminate the need for a heated enclosure. Covering the top of these forms is essential to retain all the heat of hydration.
Many building officials who are not familiar with Advantage ICF blocks may require ICF wall pours to follow the typical cold weather concrete practices that were developed for conventional concrete forms. Cold weather concrete practices may vary between jurisdictions. Be sure to check with your local official before pouring concrete on a cold day in your area. Also check with your ready-mix concrete supplier to see what options they for concrete being poured in cold weather.
Do you have more in-depth questions about pouring concrete in cold weather and how the Advantage ICF System is ideal for this? Contact an Advantage team member today for assistance.
For more on Advantage Insulating Concrete Forms visit http://www.advantageicf.com
Many studies have been done on this topic and they have all concluded basically that concrete can be placed in ICF walls at temperatures much lower than that allowed for concrete walls using conventional forming systems.
Unfortunately I cannot give exact temperatures because people reading this may be in different climates around the world. However, I can say that using Advantage ICF blocks instead of conventional will prevent freezing and reduce or even eliminate the need for a heated enclosure. Covering the top of these forms is essential to retain all the heat of hydration.
Many building officials who are not familiar with Advantage ICF blocks may require ICF wall pours to follow the typical cold weather concrete practices that were developed for conventional concrete forms. Cold weather concrete practices may vary between jurisdictions. Be sure to check with your local official before pouring concrete on a cold day in your area. Also check with your ready-mix concrete supplier to see what options they for concrete being poured in cold weather.
Do you have more in-depth questions about pouring concrete in cold weather and how the Advantage ICF System is ideal for this? Contact an Advantage team member today for assistance.
For more on Advantage Insulating Concrete Forms visit http://www.advantageicf.com


 The Advantage T-Block is designed with our patented interlock that keeps the
webs aligned for consistent spacing for attachment of interior and exterior
finishes. T-Block provides both a 6 and 8 inch concrete core for the
intersecting wall. This insulating concrete form configuration of a T-wall is
more efficient by eliminating cutting and bracing in comparison to manually
constructing a T-wall with only straight forms.
As part of the new product line, Advantage has included the only height
adjuster T-Block in the industry.
The purpose of the height adjuster is to allow greater flexibility in wall
heights so standard height T-Blocks do not have to be cut creating waste on
site.
The Advantage ICF T-Block is the best choice for internal walls because its
design eliminates job site waste and speeds up construction. The T-blocks
quickly and easily form a pilaster for posts in commercial and agricultural
grade beams and frost walls.
Visit our information page on the Advantage ICF System T-Block
About Advantage
The Advantage Insulating Concrete Forming System then aligned with
Plasti-Fab Ltd. part of the PFB Corporation, because of their unsurpassed
expertise in Expanded Polystyrene (EPS) technology. Plasti-Fab’s experience in
EPS product engineering, testing, manufacturing and distribution gave the
Advantage Insulating Concrete Forming System the quality needed to succeed.
For more information visit
www.advantageicf.com
| www.plastifab.com |
www.pfbcorp.com
Follow us on Twitter
@AdvantageICF
| @PlastiFab |
@PFBSpeak
The Advantage T-Block is designed with our patented interlock that keeps the
webs aligned for consistent spacing for attachment of interior and exterior
finishes. T-Block provides both a 6 and 8 inch concrete core for the
intersecting wall. This insulating concrete form configuration of a T-wall is
more efficient by eliminating cutting and bracing in comparison to manually
constructing a T-wall with only straight forms.
As part of the new product line, Advantage has included the only height
adjuster T-Block in the industry.
The purpose of the height adjuster is to allow greater flexibility in wall
heights so standard height T-Blocks do not have to be cut creating waste on
site.
The Advantage ICF T-Block is the best choice for internal walls because its
design eliminates job site waste and speeds up construction. The T-blocks
quickly and easily form a pilaster for posts in commercial and agricultural
grade beams and frost walls.
Visit our information page on the Advantage ICF System T-Block
About Advantage
The Advantage Insulating Concrete Forming System then aligned with
Plasti-Fab Ltd. part of the PFB Corporation, because of their unsurpassed
expertise in Expanded Polystyrene (EPS) technology. Plasti-Fab’s experience in
EPS product engineering, testing, manufacturing and distribution gave the
Advantage Insulating Concrete Forming System the quality needed to succeed.
For more information visit
www.advantageicf.com
| www.plastifab.com |
www.pfbcorp.com
Follow us on Twitter
@AdvantageICF
| @PlastiFab |
@PFBSpeak
 Architect Bruce Eason of New South Design specializes in classic, old
world, custom home design. Many of his designs are also sold as house
plans through his company New South Classics. Eason was contacted by a
homeowner interested in constructing his popular Seabrook home plan on
the southeast coast of Seabrook Island, outside of Charleston, South
Carolina.
“We took our Seabrook design, with traditional stick framing, and
modified it to withstand the forces of nature as this house was to be
built right on the water,” said Eason. “The owner wanted to be sure that
they had enough structure to handle the wind and water loads that typical
hurricanes with wind and tidal surges could produce, and meet applicable
building codes.”
Architect Bruce Eason of New South Design specializes in classic, old
world, custom home design. Many of his designs are also sold as house
plans through his company New South Classics. Eason was contacted by a
homeowner interested in constructing his popular Seabrook home plan on
the southeast coast of Seabrook Island, outside of Charleston, South
Carolina.
“We took our Seabrook design, with traditional stick framing, and
modified it to withstand the forces of nature as this house was to be
built right on the water,” said Eason. “The owner wanted to be sure that
they had enough structure to handle the wind and water loads that typical
hurricanes with wind and tidal surges could produce, and meet applicable
building codes.”
 Working with a structural engineer, Eason specified the Advantage ICF
System® for the above grade walls. The Advantage ICF System delivers two
continuous layers of expanded polystyrene insulation for exceptional
energy efficiency, along with the strength and durability of
reinforced concrete. Light gauge steel framing was used for the roof
and interior walls.
“The Charleston summers are hot and humid,” said Eason. “ICF
construction added greatly to the thermal protection for
increased efficiency and comfort. The strength of the ICFs combined
with the all steel framing is very important in hurricane
prone areas. In this area you’ve got wind, water, heat and
humidity—ICFs help mitigate all of that.”
Despite the home’s robust structure that is designed to withstand 140 mph
winds, it retains the character of an authentic turn-ofthe- century
Charleston-style home.
“You can use a new technology like ICFs and finish with a home that looks
appropriate in the Charleston Lowcountry,” said Eason. “What’s behind the
walls is very different than what you expect. It is very high-tech,
energy-efficient, and it enhances the safety and durability of the
house.”
Working with a structural engineer, Eason specified the Advantage ICF
System® for the above grade walls. The Advantage ICF System delivers two
continuous layers of expanded polystyrene insulation for exceptional
energy efficiency, along with the strength and durability of
reinforced concrete. Light gauge steel framing was used for the roof
and interior walls.
“The Charleston summers are hot and humid,” said Eason. “ICF
construction added greatly to the thermal protection for
increased efficiency and comfort. The strength of the ICFs combined
with the all steel framing is very important in hurricane
prone areas. In this area you’ve got wind, water, heat and
humidity—ICFs help mitigate all of that.”
Despite the home’s robust structure that is designed to withstand 140 mph
winds, it retains the character of an authentic turn-ofthe- century
Charleston-style home.
“You can use a new technology like ICFs and finish with a home that looks
appropriate in the Charleston Lowcountry,” said Eason. “What’s behind the
walls is very different than what you expect. It is very high-tech,
energy-efficient, and it enhances the safety and durability of the
house.”
 “The home provides us with a great example of
disaster-resistant and energy-efficient construction using the
Advantage ICF System,” said Advantage ICF System Product Manager
Greg Doren.
For more information on the strength of ICFs and how to integrate them into
your project, visit http://www.advantageicf.com
“The home provides us with a great example of
disaster-resistant and energy-efficient construction using the
Advantage ICF System,” said Advantage ICF System Product Manager
Greg Doren.
For more information on the strength of ICFs and how to integrate them into
your project, visit http://www.advantageicf.com
![]() ADVANTAGE ICF SYSTEM® FOR FROST WALL or GRADE BEAM CONSTRUCTION
Written by Sean McBeth
Follow me on Twitter
@Sean_PlastiFab
ADVANTAGE ICF SYSTEM® FOR FROST WALL or GRADE BEAM CONSTRUCTION
Written by Sean McBeth
Follow me on Twitter
@Sean_PlastiFab
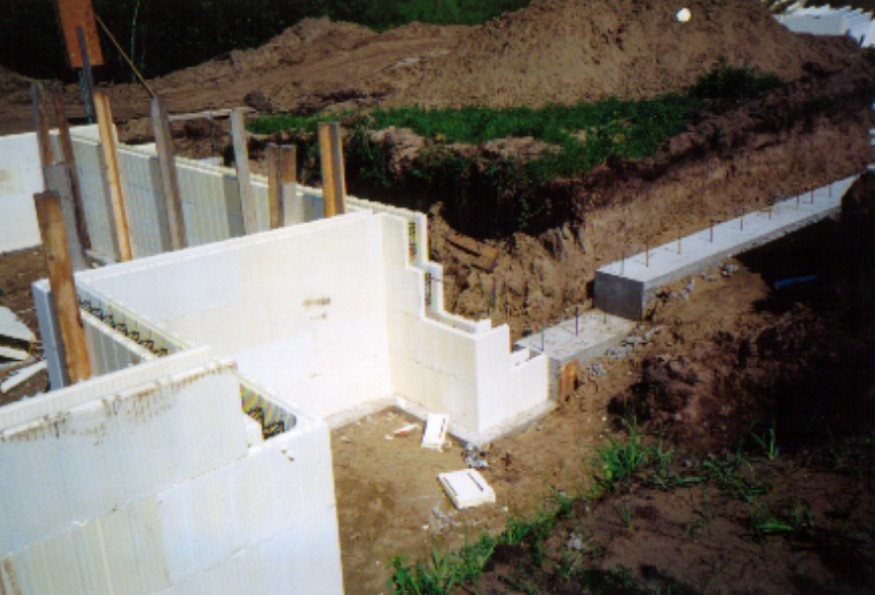
Last week we took a slight detour from our commercial series to highlight the importance of sustainability. If you can remember back to the previous blog, Melissa talked about Plasti-Fab GeoSpan® compressible fill material and its uses in commercial construction. Moving up our commercial structure brings us to the topic of this week’s blog: Frost Wall or Grade Beam construction using Advantage ICFs.
The subject of this discussion will be using the Advantage ICF System to construct an insulated grade beam or frost wall as the foundation for a commercial building. Just like residential construction, commercial construction is not exempt from the ever increasing concern with energy efficiency, and the reduced consumption of non-renewable resources. So when you are constructing a new commercial building it would only make sense to build using the most energy efficient building practices and materials available.

The ADVANTAGE ICF System® is the ideal building material for below grade forming since it is light weight and easily modified. By using a stay-in-place ICF as your concrete form for your frost wall or grade beam you eliminate the need for reusable forms to be rented and erected prior to placing the concrete. The stay-in-place forms do not have be stripped and returned once the concrete is set. The Advantage ICF system provides R-22.5 monolithic insulation that eliminates the added labour costs involved in having to insulate the entire perimeter of a commercial building’s frost wall.
One of the added advantages of using the ADVANTAGE ICF System for frost wall / grade beam applications is that it is an easily modified building material. What this means is that you have the flexibility to make changes to the block prior to the concrete pour. Making these changes is very easy. In the case of a grade beam application one face of the block can be easily cut with a hand saw to incorporate inner pilasters to support columns. Of course you will need to ensure proper bracing when any of the ICF blocks have been modified from their original form.
Having a properly insulated frost wall under your commercial building equates to lower operating costs for the tenant(s) of the building. As less energy is being used, related greenhouse gasses are proportionally reduced. Today, more than ever, building an energy-efficient structure is the right environmental choice and will provide savings in energy costs.
To learn more about the Advantage ICF System visit www.advantageicf.com
Stay tuned for next week when we cover Insulating the Slab.
![]() NEW Advantage ICF T-block design solves demand in industry
The growth in the demand for fire safety, comfort & reduction in noise
transference in Commercial and Multi-family projects has created a higher
demand for ICFs as internal walls. Included in this demand, single
family homes have increased the demand for ICF internal walls where the same
issues apply such as media rooms and garage to house wall separations.
Plasti-Fab’s ICF division has developed The Advantage T-Block to address these
specific needs. Designed with their patented interlock that keeps the webs
aligned for consistent spacing for attachment of interior and exterior
finishes, the Advantage ICF T-block is a handy, on the job solution for
intersecting walls.
NEW Advantage ICF T-block design solves demand in industry
The growth in the demand for fire safety, comfort & reduction in noise
transference in Commercial and Multi-family projects has created a higher
demand for ICFs as internal walls. Included in this demand, single
family homes have increased the demand for ICF internal walls where the same
issues apply such as media rooms and garage to house wall separations.
Plasti-Fab’s ICF division has developed The Advantage T-Block to address these
specific needs. Designed with their patented interlock that keeps the webs
aligned for consistent spacing for attachment of interior and exterior
finishes, the Advantage ICF T-block is a handy, on the job solution for
intersecting walls.
 T-Block provides a 6 and 8 inch concrete core for both the intersecting wall.
This insulating concrete form configuration of a T-wall is more efficient by
eliminating cutting and bracing in comparison to manually constructing a
T-wall with only straight forms. When you want to create an intersecting wall
with the ICF forms, place a T-block between your straight blocks and you have
a straight, true perpendicular wall.
As you may know, the Advantage ICF System has a half block available in the
straight and corner blocks to allow for the varying heights of walls in your
project. As part of the new product line, Advantage has included the only
height adjuster T-Block in the industry. The purpose of the height adjuster is
to allow greater flexibility in wall heights so standard height T Blocks do
not have to be cut creating waste on site.
The Advantage ICF T-block is the best choice for internal walls because its
design eliminates job site waste and speeds up construction. The
T-blocks quickly and easily form a Pilaster for posts in commercial and
agricultural grade beams and Frost Walls. It also provides a seamless for
Timber Frame and other style homes.
T-Block provides a 6 and 8 inch concrete core for both the intersecting wall.
This insulating concrete form configuration of a T-wall is more efficient by
eliminating cutting and bracing in comparison to manually constructing a
T-wall with only straight forms. When you want to create an intersecting wall
with the ICF forms, place a T-block between your straight blocks and you have
a straight, true perpendicular wall.
As you may know, the Advantage ICF System has a half block available in the
straight and corner blocks to allow for the varying heights of walls in your
project. As part of the new product line, Advantage has included the only
height adjuster T-Block in the industry. The purpose of the height adjuster is
to allow greater flexibility in wall heights so standard height T Blocks do
not have to be cut creating waste on site.
The Advantage ICF T-block is the best choice for internal walls because its
design eliminates job site waste and speeds up construction. The
T-blocks quickly and easily form a Pilaster for posts in commercial and
agricultural grade beams and Frost Walls. It also provides a seamless for
Timber Frame and other style homes.


Each year, students in Okanagan College’s Residential Construction Program build one of six Home for Learning projects on their way to earning Level One standing in a Carpentry Apprenticeship or becoming a Residential Framing Technician. As the college’s Construction Trades Department

Chairperson Alf Leimert points out, for many of the first-year students, this is their first onsite construction experience and one of the most valuable aspects of their construction education.
“That building is their vehicle for learning the curriculum as well as newer techniques and technologies,” said Leimert. “If we didn’t have real life buildings, students would have to learn using small mockups, and it is not the same as working on a real construction site.”

The 3,000 sq. ft. home in Kelowna is a partnership between the college, the Canadian Home Builders’ Association (CHBA) of Central Okanagan, Melcor Developments, and local builder Terry Heinrich of Distinctive Developments. Heinrich designed the home to meet Built Green standards, using the Advantage ICF System® donated by Plasti-Fab for the basement walls. He has relied on ICF construction for over three years to deliver long-term thermal resistance, low air infiltration and reduced noise transmission in his homes.
“I love ICFs, and not only from the standpoint of reducing greenhouse gas emissions,” he said. “The ability of ICF walls to block out sound and create a comfortable home is phenomenal. And I can say that because I live in an ICF home.”
Building on the energy efficiency of the Advantage ICF System, Heinrich used high performance argon-filled windows, a tankless hot water heater, and a 19 SEER heat pump.
“Working with the CHBA and Okanagan College is a great opportunity to get future builders hands-on training with highly energy efficient building products like the Advantage ICF System,” said Plasti-Fab Representative Sean McBeth.
Download a printed version of this story at http://www.plastifab.com/pf_profiles/Okanagan%20College%20Home%20For%20Learning%20Kelowna.pdf
or visit www.advantageicf.com for
more information on the Advantage ICF Products.
![]() Video: Residence constructed with Advantage ICF System
Monday you read about a senior home that chose Advantage ICF block as its
method of construction in order to save on their energy bills. With the help
of timelapse photography, watch this residence being constructed with the
Advantage ICF System.
Video: Residence constructed with Advantage ICF System
Monday you read about a senior home that chose Advantage ICF block as its
method of construction in order to save on their energy bills. With the help
of timelapse photography, watch this residence being constructed with the
Advantage ICF System.


 You can see more projects at
www.advantageicf.com
You can see more projects at
www.advantageicf.com
 Footings are the base on which you erect the foundation walls of your
building. The footings ensure the load from the walls are spread evenly
to the soil below. A level and square footing is always best to start with. If
your footings are not square and level, this will potentially slow the
installation of your ICF walls. It is recommended that the maximum variance in
elevation on a footing not be greater than ¼” in height. If there is a
variance in level greater than ¼” in your footing elevation it will require
shimming or trimming the bottom edge of the first course of ICF blocks to
ensure that the start of your build is kept level.
Keep in mind that prior to starting any building project it is strongly
advised to consult the local building authorities to confirm the requirements
are for building in your area. In some cases there may be municipal
regulations that add requirements beyond Provincial Building Codes.
In general, the width of your footing should be no less than 24”, but wider
footings may be required dependent upon the design requirements for your
application. A 24” width will ensure that you have sufficient room to place
either the 6” or 8” Advantage ICF blocks. On the 6” Advantage ICF the total
width of the form is 11.25” which leaves you with 6.375” of the footing on
either side of the block. The 8” ICF has a total width of 13.25” thus giving
you 4.375” on each side of the Advantage ICF block. In both instances, this is
using the centerline of the footing as the centerline of your wall.
If you are doing a walkout basement you will require step footings to
accommodate the frost wall. The Advantage ICF blocks have a height of 16.5” on
both the 6” and 8” product line. The NBC (National Building Code) states that
the maximum rise or height for step footings shall be no greater than 24”. You
have two options when making your step footings when using the Advantage ICF
system. Firstly, you can use 3 – 2”x6” pieces of lumber stacked on their
edge which equals a total height of 16.5” matching the height of the Advantage
block. If doing a 4’ frost wall this is the best way to do your step footings
as 3 steps at 16.5” equals 49.5” (3 courses of Advantage ICF). Refer to
the diagram & photograph below which illustrates how this is achieved.
Footings are the base on which you erect the foundation walls of your
building. The footings ensure the load from the walls are spread evenly
to the soil below. A level and square footing is always best to start with. If
your footings are not square and level, this will potentially slow the
installation of your ICF walls. It is recommended that the maximum variance in
elevation on a footing not be greater than ¼” in height. If there is a
variance in level greater than ¼” in your footing elevation it will require
shimming or trimming the bottom edge of the first course of ICF blocks to
ensure that the start of your build is kept level.
Keep in mind that prior to starting any building project it is strongly
advised to consult the local building authorities to confirm the requirements
are for building in your area. In some cases there may be municipal
regulations that add requirements beyond Provincial Building Codes.
In general, the width of your footing should be no less than 24”, but wider
footings may be required dependent upon the design requirements for your
application. A 24” width will ensure that you have sufficient room to place
either the 6” or 8” Advantage ICF blocks. On the 6” Advantage ICF the total
width of the form is 11.25” which leaves you with 6.375” of the footing on
either side of the block. The 8” ICF has a total width of 13.25” thus giving
you 4.375” on each side of the Advantage ICF block. In both instances, this is
using the centerline of the footing as the centerline of your wall.
If you are doing a walkout basement you will require step footings to
accommodate the frost wall. The Advantage ICF blocks have a height of 16.5” on
both the 6” and 8” product line. The NBC (National Building Code) states that
the maximum rise or height for step footings shall be no greater than 24”. You
have two options when making your step footings when using the Advantage ICF
system. Firstly, you can use 3 – 2”x6” pieces of lumber stacked on their
edge which equals a total height of 16.5” matching the height of the Advantage
block. If doing a 4’ frost wall this is the best way to do your step footings
as 3 steps at 16.5” equals 49.5” (3 courses of Advantage ICF). Refer to
the diagram & photograph below which illustrates how this is achieved.
 Second option if you do your step footings at a height of 2 feet you can use
the Advantage Height Adjuster ICF block (7.5”) on top of a full standard block
(16.5”) to achieve the 24” height.
Second option if you do your step footings at a height of 2 feet you can use
the Advantage Height Adjuster ICF block (7.5”) on top of a full standard block
(16.5”) to achieve the 24” height.
 DOWELS
Rebar dowels should be placed to match the vertical reinforcement
size as per the rebar tables in the Advantage Technical Manual or the
blueprints that are engineer approved. Using 10M rebar dowels spaced at
no greater than 24” on center provides meets NBC requirements. The
dowels must be placed with a minimum of 8” embedded into the footing and 3”
concrete coverage to the bottom of the footing. Extending the dowels
vertically above the footing is required so that they can be tied into the
foundation wall rebar. If using 10M rebar, the dowels should extend a minimum
of 18” vertically above the surface of the footing and 26” vertically for 15M
rebar. This will ensure that the bottom course of your wall has
sufficient lateral support from the footing to wall connection. The diagram
below further explains how to achieve this.
DOWELS
Rebar dowels should be placed to match the vertical reinforcement
size as per the rebar tables in the Advantage Technical Manual or the
blueprints that are engineer approved. Using 10M rebar dowels spaced at
no greater than 24” on center provides meets NBC requirements. The
dowels must be placed with a minimum of 8” embedded into the footing and 3”
concrete coverage to the bottom of the footing. Extending the dowels
vertically above the footing is required so that they can be tied into the
foundation wall rebar. If using 10M rebar, the dowels should extend a minimum
of 18” vertically above the surface of the footing and 26” vertically for 15M
rebar. This will ensure that the bottom course of your wall has
sufficient lateral support from the footing to wall connection. The diagram
below further explains how to achieve this.
 Wall to Footing Connection Detail
For further information on this topic or any other please click on the link
below or call TOLL FREE 1-888-446-5377
www.advantageicf.com
Wall to Footing Connection Detail
For further information on this topic or any other please click on the link
below or call TOLL FREE 1-888-446-5377
www.advantageicf.com
 Interior drywall
Drywall is fastened to an Advantage ICF wall the same way as it would
be in a wood frame house, except I recommend you use drywall screws rather
than nails. When you screw it on make sure you hit one of the plastic webs or
ties spaced at 8” on center for 6” ICF walls or 6” on center for 8” ICF walls.
Typically a standard stud finder will find these ties as it would normal wood
studs. I would recommend using a little longer than normal drywall screw with
a coarse thread pattern.
Note: that an indented line marks all Advantage ICF System blocks at 25.4
mm (1”) intervals to simplify measuring and marking. Double lines mark web
locations.
What types of fasteners are required for drywall?
Wall
coverings can typically be attached to the ties or webs in your ICF system
with #6 or #8 Type W (coarse thread) drywall screws. The screws must be
corrosion resistant and have a sufficient length to penetrate the plastic tie
or web a minimum of ¼” (6.4mm). #6 Type W drywall screws will provide an
allowable pull-out capacity of 36 lbs (160 N) and an allowable lateral load
capacity or 66 lbs (294 N). #8 Type W drywall screws will provide a slightly
higher allowable pull-out capacity of 44 lbs (196 N) and an allowable lateral
load capacity or 98 lbs (436 N).
What about stucco?
Conventional stuccos are applied by
attaching the wire straight to the ties or webs with pan-head screws. Acrylic
stucco manufacturers may require only typical foam preparation and the
application directly onto the surface of the ICF with no stucco wire.
Interior drywall
Drywall is fastened to an Advantage ICF wall the same way as it would
be in a wood frame house, except I recommend you use drywall screws rather
than nails. When you screw it on make sure you hit one of the plastic webs or
ties spaced at 8” on center for 6” ICF walls or 6” on center for 8” ICF walls.
Typically a standard stud finder will find these ties as it would normal wood
studs. I would recommend using a little longer than normal drywall screw with
a coarse thread pattern.
Note: that an indented line marks all Advantage ICF System blocks at 25.4
mm (1”) intervals to simplify measuring and marking. Double lines mark web
locations.
What types of fasteners are required for drywall?
Wall
coverings can typically be attached to the ties or webs in your ICF system
with #6 or #8 Type W (coarse thread) drywall screws. The screws must be
corrosion resistant and have a sufficient length to penetrate the plastic tie
or web a minimum of ¼” (6.4mm). #6 Type W drywall screws will provide an
allowable pull-out capacity of 36 lbs (160 N) and an allowable lateral load
capacity or 66 lbs (294 N). #8 Type W drywall screws will provide a slightly
higher allowable pull-out capacity of 44 lbs (196 N) and an allowable lateral
load capacity or 98 lbs (436 N).
What about stucco?
Conventional stuccos are applied by
attaching the wire straight to the ties or webs with pan-head screws. Acrylic
stucco manufacturers may require only typical foam preparation and the
application directly onto the surface of the ICF with no stucco wire.
 What about Siding?
Horizontal joints: strapping between the ties or webs using metal
banding may be required if the siding joints line up with the joints in the
block (where there are not ties or webs)
J trim: bucks may have to be modified to allow for certain types
Corners: strapping around corners with metal banding may be necessary for
certain corner moldings. Use screws to install all sidings.
Note: All interior ICF surfaces must be covered by an acceptable thermal
barrier. Exterior finishes and application requirements may vary based on
local code requirements.
Do you have questions about a finish I did not cover?
If
I did not cover one of the finishes you have in mind for your project, or you
have more questions about what I talked about today, let me know.
Visit www.advantageicf.com for more
information on our products.
What about Siding?
Horizontal joints: strapping between the ties or webs using metal
banding may be required if the siding joints line up with the joints in the
block (where there are not ties or webs)
J trim: bucks may have to be modified to allow for certain types
Corners: strapping around corners with metal banding may be necessary for
certain corner moldings. Use screws to install all sidings.
Note: All interior ICF surfaces must be covered by an acceptable thermal
barrier. Exterior finishes and application requirements may vary based on
local code requirements.
Do you have questions about a finish I did not cover?
If
I did not cover one of the finishes you have in mind for your project, or you
have more questions about what I talked about today, let me know.
Visit www.advantageicf.com for more
information on our products.
 Concrete construction during cold weather conditions requires special
consideration to ensure that the concrete achieves the desired strength prior
to freezing. Conventional concrete form walls can be constructed in all
seasons; however, during cold weather months special measures must be taken to
prevent the concrete from freezing. The special measures may include the use
of windbreaks, insulated formwork and/or heaters. These extra measures can
greatly increase construction costs.
Advantage Insulated Concrete Forms (ICF) offer the ability to pour concrete
into your walls at temperatures colder than that of conventional concrete
forms due to their high insulating properties. This ability can drastically
extend your construction season, possibly allowing you to pour all year round.
In very cold weather conditions, minimal precautions may be required,
especially at wall penetrations and edges.
Concrete construction during cold weather conditions requires special
consideration to ensure that the concrete achieves the desired strength prior
to freezing. Conventional concrete form walls can be constructed in all
seasons; however, during cold weather months special measures must be taken to
prevent the concrete from freezing. The special measures may include the use
of windbreaks, insulated formwork and/or heaters. These extra measures can
greatly increase construction costs.
Advantage Insulated Concrete Forms (ICF) offer the ability to pour concrete
into your walls at temperatures colder than that of conventional concrete
forms due to their high insulating properties. This ability can drastically
extend your construction season, possibly allowing you to pour all year round.
In very cold weather conditions, minimal precautions may be required,
especially at wall penetrations and edges.
 Many studies have been done on this topic and they have all concluded
basically that concrete can be placed in ICF walls at temperatures much lower
than that allowed for concrete walls using conventional forming systems.
Unfortunately I cannot give exact temperatures because people reading this may
be in different climates around the world. However, I can say that using
Advantage ICF blocks instead of conventional will prevent freezing and reduce
or even eliminate the need for a heated enclosure. Covering the top of these
forms is essential to retain all the heat of hydration.
Many building officials who are not familiar with Advantage ICF blocks may
require ICF wall pours to follow the typical cold weather concrete practices
that were developed for conventional concrete forms. Cold weather concrete
practices may vary between jurisdictions. Be sure to check with your local
official before pouring concrete on a cold day in your area. Also check with
your ready-mix concrete supplier to see what options they for concrete being
poured in cold weather.
—-
Do you have more indepth questions for Colin about pouring concrete in cold
weather and how the Advantage ICF System is ideal for this?
Email him at
cshowalter@plastifab.com or send
him a direct message tweet on Twitter to
@Colin_PlastiFab
For more on Advantage Insulating Concrete Forms visit
http://www.advantageicf.com
Many studies have been done on this topic and they have all concluded
basically that concrete can be placed in ICF walls at temperatures much lower
than that allowed for concrete walls using conventional forming systems.
Unfortunately I cannot give exact temperatures because people reading this may
be in different climates around the world. However, I can say that using
Advantage ICF blocks instead of conventional will prevent freezing and reduce
or even eliminate the need for a heated enclosure. Covering the top of these
forms is essential to retain all the heat of hydration.
Many building officials who are not familiar with Advantage ICF blocks may
require ICF wall pours to follow the typical cold weather concrete practices
that were developed for conventional concrete forms. Cold weather concrete
practices may vary between jurisdictions. Be sure to check with your local
official before pouring concrete on a cold day in your area. Also check with
your ready-mix concrete supplier to see what options they for concrete being
poured in cold weather.
—-
Do you have more indepth questions for Colin about pouring concrete in cold
weather and how the Advantage ICF System is ideal for this?
Email him at
cshowalter@plastifab.com or send
him a direct message tweet on Twitter to
@Colin_PlastiFab
For more on Advantage Insulating Concrete Forms visit
http://www.advantageicf.com

A home built using the Advantage ICF System will make a wall structure more energy efficient and significantly reduce the energy loss compared to a conventional new home constructed using wood stud framing and batt insulation. (The conventional home does not include any Plastispan like Melissa described in the previous blogs.) The graph below provides a comparison of the effective R-value for a wall assembly constructed using the Advantage ICF System versus a wood frame system with R-20 insulation.

Unintentional air leakage can be one of the biggest sources of heat loss in many buildings. Air leakage rates vary widely for different types of construction methods. For example, a 3,900 square foot home (similar to the one shown) using the Advantage ICF System for both above and below grade walls was tested for air tightness in comparison to energy efficient design requirements. The air leakage rate was found to be 0.22 air changes per hour indicating a very airtight structure. This confirms that the solid, continuous insulation wall construction provided by the Advantage ICF System will result in significant reduction in air leakage versus other types of wall construction.

When building your whole house with ICF you increase the R-value and decrease the air leakage of your home. Builders and home owners alike ask me all the time what is the best furnace upgrade they should put in there new ICF house. My response is, “Why would you spend lots of money on a furnace that will never run?”
For more information on Advantage ICFs, visit http://www.advantageicf.com
Next: Learn the next step in energy efficiency as we insulate your
basement floor.
![]() What does an Advantage ICF basement look like?
Foundations come in all shapes and sizes. Here you can see some samples of
insulating concrete forming system basements from our recent projects.
What does an Advantage ICF basement look like?
Foundations come in all shapes and sizes. Here you can see some samples of
insulating concrete forming system basements from our recent projects.
 In addition, watch how how an ICF foundation is built in ou YouTube videos on
the
Plasti-Fab Channel
In addition, watch how how an ICF foundation is built in ou YouTube videos on
the
Plasti-Fab Channel
![]() Building your foundation using Insulated Concrete Forms (ICF’s)
Written By Colin Showalter
Building your foundation using Insulated Concrete Forms (ICF’s)
Written By Colin Showalter
As Melissa described in the previous two blogs everyone wants a useable basement. So when designing and constructing your new house I suggest you consider the Advantage ICF System for your basement foundation.
Imagine spending time with your family, in the heart of winter, in your basement, and it being the most comfortable place in your house. Sounds like a fantasy doesn’t it? We all know most basements are cold and uncomfortable. However, ask anyone who has a house with an ICF basement, and they will tell you that this fantasy has become reality.
Walls built with the Advantage ICF system provide improved energy efficiency that results in reduced operating costs for the life of the building. In addition, since less energy is being used, related greenhouse gas emissions are proportionately reduced. Today, more than ever, building an energy-efficient structure is the right environmental choice and will provide savings in energy costs.
 A basement built with the Advantage ICF System will make a wall structure at
least 40% more energy-efficient and significantly reduce heat transfer
compared to a new conventionally built home. Some of you might wonder, what is
heat transfer? That is the loss of your warm air to the outside in the winter
(or heat gain from the outside in the summer), or perhaps more aptly put, the
loss of your energy dollars.
A basement built with the Advantage ICF System will make a wall structure at
least 40% more energy-efficient and significantly reduce heat transfer
compared to a new conventionally built home. Some of you might wonder, what is
heat transfer? That is the loss of your warm air to the outside in the winter
(or heat gain from the outside in the summer), or perhaps more aptly put, the
loss of your energy dollars.
Using the Advantage ICF System can translate into savings in energy consumption of at least 30%. A poorly insulated below-grade foundation wall can account for more than 50% of the total heat loss from a house. The graph below provides a comparison of the effective R-value provided by a below grade wall constructed with the Advantage ICF System wall versus a typical concrete wall with wood frame wall and R-8 batt insulation.

There you have it! Fantasy becomes reality when you build your basement foundation with the Advantage ICF System. Your basement living space becomes the most comfortable place in your home. The biggest complaint I hear from people who build their basements with ICF is “Why didn’t I build the whole house like this?”

Next: Learn the next step in energy efficiency as we build the first floor of our Plasti-Fab Solutions Home using Insulspan SIPS.
For more information on foundation insulation, visit
plastifab.com or
advantageicf.com for our extensive
technical libraries with installation manuals, product information bulletins,
and more.
![]() How do you do a radius wall using ICF block?
Written
by: Colin Showalter
Follow Colin on Twitter
@Colin_PlastiFab
Something you see much more frequently in today’s residential architecture is
curved or radius walls. So the question is, can you do this with ICF block
and, if so, how? In this blog I will answer both of those questions.
Yes, you can do curved/radius walls with ICF block. Obviously there are limitations depending on radius, window or door opening
and other factors. However, typically anything you can do with conventional
forms you can do with ICF forms.
How do you do a radius wall using ICF block?
Written
by: Colin Showalter
Follow Colin on Twitter
@Colin_PlastiFab
Something you see much more frequently in today’s residential architecture is
curved or radius walls. So the question is, can you do this with ICF block
and, if so, how? In this blog I will answer both of those questions.
Yes, you can do curved/radius walls with ICF block. Obviously there are limitations depending on radius, window or door opening
and other factors. However, typically anything you can do with conventional
forms you can do with ICF forms.
 First: Radius walls are constructed by removing sections from the inside side
panel and bending the ICF into the required shape.
Second: Run lath stripes around the blocks and then brace with your bracing
system to hold the curve.
Important: Horizontal rebar as specified, must
be bent to the appropriate radius to be inserted in each course of block. (as
required by the local building code)
Third: Repeat the above steps for each row of block. Note: Curves are a great
place to use up off cuts and small pieces of block to reduce your waste. Just
make sure it is securely braced.
Fourth: Drop in vertical rebar as you would with any other wall as required by
the local building code.
By following these simple steps you can easily build any radius wall on site.
And remember “If you have a miter saw, there is no point in paying for
specialty blocks.” Specialty radius blocks are very pricey and can escalate
your building costs substantially.
Please stay tuned as we develop a video of the above steps to further help
explain this topic.
Coming Soon: revisiting “rebar”
First: Radius walls are constructed by removing sections from the inside side
panel and bending the ICF into the required shape.
Second: Run lath stripes around the blocks and then brace with your bracing
system to hold the curve.
Important: Horizontal rebar as specified, must
be bent to the appropriate radius to be inserted in each course of block. (as
required by the local building code)
Third: Repeat the above steps for each row of block. Note: Curves are a great
place to use up off cuts and small pieces of block to reduce your waste. Just
make sure it is securely braced.
Fourth: Drop in vertical rebar as you would with any other wall as required by
the local building code.
By following these simple steps you can easily build any radius wall on site.
And remember “If you have a miter saw, there is no point in paying for
specialty blocks.” Specialty radius blocks are very pricey and can escalate
your building costs substantially.
Please stay tuned as we develop a video of the above steps to further help
explain this topic.
Coming Soon: revisiting “rebar”
![]() How-to do electrical in my Advantage ICF Walls
Written by: Colin Showalter
Follow Colin on Twitter
@Colin_PlastiFab
A frequently asked question
How-to do electrical in my Advantage ICF Walls
Written by: Colin Showalter
Follow Colin on Twitter
@Colin_PlastiFab
A frequently asked question I get is,
“How do I do my electrical in my Advantage
ICF
walls?”
I will explain to you how easy these few steps can be.
Step 1
Standard electrical boxes which are 3” deep can be cut into the EPS
insulation which is 2-5/8” thick. That will leave the electrical boxes
extending beyond the EPS to accommodate the ½” interior drywall. Boxes can
either be mechanically fastened to the ties in the block or concrete. Boxes
can also be glued in place with low expansion foam. All of these methods are
common practice.
Step 2
Grooves can be easily cut in the EPS by using a variety of different
tools. I would recommend using an ELECTRIC chainsaw. It easily zips through
the EPS foam and makes nice clean grooves. It also seems to create the least
mess than any other method. Typically, chainsaws have holes in the blade which
you can use to bolt a guide that will allow you to set a depth of your grooves
to 1.5”. 1.5” is your building code requirement for depth of your wires.
Some people prefer to use either hot knives or routers. I find that hot knives
seem to be the most labour intensive way to cut through the foam and routers
tend to create a large mess of EPS dust to clean up.
All methods are acceptable and all work. However, DO NOT use a standard
gasoline chainsaw to do this job. The EPS foam and gasoline mixture will
combine and turn into a goo this clogs up your chainsaw very fast rendering it
garbage.
Step 3
After the wires have been pushed into the grooves then wired into
switches and plugs, they will need to be inspected by an inspector as usual.
Once inspection is passed, you can fill the grooves with a low expansion foam.
Filling the grooves will secure the wires in place and recover your insulation
that was removed.
Note: All electrical work is to be done by a licensed electrician.
Following these three simple steps will make performing electrical work in
your Advantage ICF walls easier than ever.
Need more info on the Advantage ICF System?
Visit the web site.
I get is,
“How do I do my electrical in my Advantage
ICF
walls?”
I will explain to you how easy these few steps can be.
Step 1
Standard electrical boxes which are 3” deep can be cut into the EPS
insulation which is 2-5/8” thick. That will leave the electrical boxes
extending beyond the EPS to accommodate the ½” interior drywall. Boxes can
either be mechanically fastened to the ties in the block or concrete. Boxes
can also be glued in place with low expansion foam. All of these methods are
common practice.
Step 2
Grooves can be easily cut in the EPS by using a variety of different
tools. I would recommend using an ELECTRIC chainsaw. It easily zips through
the EPS foam and makes nice clean grooves. It also seems to create the least
mess than any other method. Typically, chainsaws have holes in the blade which
you can use to bolt a guide that will allow you to set a depth of your grooves
to 1.5”. 1.5” is your building code requirement for depth of your wires.
Some people prefer to use either hot knives or routers. I find that hot knives
seem to be the most labour intensive way to cut through the foam and routers
tend to create a large mess of EPS dust to clean up.
All methods are acceptable and all work. However, DO NOT use a standard
gasoline chainsaw to do this job. The EPS foam and gasoline mixture will
combine and turn into a goo this clogs up your chainsaw very fast rendering it
garbage.
Step 3
After the wires have been pushed into the grooves then wired into
switches and plugs, they will need to be inspected by an inspector as usual.
Once inspection is passed, you can fill the grooves with a low expansion foam.
Filling the grooves will secure the wires in place and recover your insulation
that was removed.
Note: All electrical work is to be done by a licensed electrician.
Following these three simple steps will make performing electrical work in
your Advantage ICF walls easier than ever.
Need more info on the Advantage ICF System?
Visit the web site.
![]() How-to do an Uncommon ICF Angle on Site
Written By:
Colin Showalter
Follow Colin on Twitter
@Colin_PlastiFab
The Advantage ICF system has two typical corner blocks – 90 degree and 45
degree. So what do you do when your project calls for a 35 degree or a 120
degree angle? Well, let me explain.
The answer is simple. A simple miter joint can be created by bevel cutting
standard straight blocks to accommodate any angle on site.
Step 1: Start from a corner block (45 or 90 degree) and work
towards the uncommon corner requiring a miter joint.
Step 2: Bevel cut the foam on the edge of two standard
straight blocks at the angle required to match the angle of the to create the
uncommon miter joint.
Step 3: Place pre-bent rebar going throughout the corner to
match the rebar pattern.
Repeat steps 2 and 3 for all sequential rows of ICF block.
Step 4: Spray foam the gap if you feel the miter joint
doesn’t fit tight. Use a low expansion spray foam.
Step 5: Strap the corner with Advantage multi-strap the same
as you would with all the other corners.
Step 6: Build 2-2×6 lumber “L’s” or “strong backs” place
these vertically on the back side of the miter jointed corner fastening them
to the Advantage ICF ties.
Note: you may save time if you have multiple miter corners by building a
miter box
Following these steps will allow you to build a monolithic concrete wall
throughout any uncommon angle in your project. Be sure to continue to follow
all local building codes.
Coming soon: When do you need a taper top block?
How-to do an Uncommon ICF Angle on Site
Written By:
Colin Showalter
Follow Colin on Twitter
@Colin_PlastiFab
The Advantage ICF system has two typical corner blocks – 90 degree and 45
degree. So what do you do when your project calls for a 35 degree or a 120
degree angle? Well, let me explain.
The answer is simple. A simple miter joint can be created by bevel cutting
standard straight blocks to accommodate any angle on site.
Step 1: Start from a corner block (45 or 90 degree) and work
towards the uncommon corner requiring a miter joint.
Step 2: Bevel cut the foam on the edge of two standard
straight blocks at the angle required to match the angle of the to create the
uncommon miter joint.
Step 3: Place pre-bent rebar going throughout the corner to
match the rebar pattern.
Repeat steps 2 and 3 for all sequential rows of ICF block.
Step 4: Spray foam the gap if you feel the miter joint
doesn’t fit tight. Use a low expansion spray foam.
Step 5: Strap the corner with Advantage multi-strap the same
as you would with all the other corners.
Step 6: Build 2-2×6 lumber “L’s” or “strong backs” place
these vertically on the back side of the miter jointed corner fastening them
to the Advantage ICF ties.
Note: you may save time if you have multiple miter corners by building a
miter box
Following these steps will allow you to build a monolithic concrete wall
throughout any uncommon angle in your project. Be sure to continue to follow
all local building codes.
Coming soon: When do you need a taper top block?
![]() Advantages of Advantage Part 3: Building Store/Dealer Perspective
Written by: Colin Showalter
Follow Colin on twitter:
@Colin_PlastiFab
If you have been following this three part series of “Advantages of Advantage”
you would already know what the advantages are to both the homeowners and the
contractor/builder. In this third part we will go through the advantages the
Building Stores/Dealers who sell the Advantage ICF System.
The most obvious advantage to selling Advantage ICF is that Plasti-Fab
manufactures the Advantage ICF System and makes it available across Canada.
This allows us to ship the block direct to site in a very timely manner to
almost all area in Canada and northern United States. This allows each
Building Store/Dealer to use their yard space to store other products. It also
means that since Plasti-Fab is delivering direct to job sites the stores do
not even need to handle the product.
Advantages of Advantage Part 3: Building Store/Dealer Perspective
Written by: Colin Showalter
Follow Colin on twitter:
@Colin_PlastiFab
If you have been following this three part series of “Advantages of Advantage”
you would already know what the advantages are to both the homeowners and the
contractor/builder. In this third part we will go through the advantages the
Building Stores/Dealers who sell the Advantage ICF System.
The most obvious advantage to selling Advantage ICF is that Plasti-Fab
manufactures the Advantage ICF System and makes it available across Canada.
This allows us to ship the block direct to site in a very timely manner to
almost all area in Canada and northern United States. This allows each
Building Store/Dealer to use their yard space to store other products. It also
means that since Plasti-Fab is delivering direct to job sites the stores do
not even need to handle the product.
 The second benefit is that Plasti-Fab fully supports their product. Which
means on-site technical advisory as well as project by project quotes are both
available at no charge. This makes it much less stressful for the stores if a
contractor has not worked with the Advantage ICF system and has some questions
or concerns about install.
Other benefits relate to the many design features of the product which were
previously discussed in the previous blogs providing benefits for homeowners
and contractor/builders, such as the patented Advantage ICF System interlock
that lines up the ties virtually eliminating concerns of attachments needed
for interior and exterior finishes for the customers of the Building
Stores/Dealers.
Hopefully I have touched on most of the benefits of the Advantage ICF System
in these last three blogs, whether you’re a homeowner, contractor/builder or a
building store/dealer. If you have any further questions feel free to contact
us.
Stay tuned: coming soon – how to do an uncommon corner angle on site
The second benefit is that Plasti-Fab fully supports their product. Which
means on-site technical advisory as well as project by project quotes are both
available at no charge. This makes it much less stressful for the stores if a
contractor has not worked with the Advantage ICF system and has some questions
or concerns about install.
Other benefits relate to the many design features of the product which were
previously discussed in the previous blogs providing benefits for homeowners
and contractor/builders, such as the patented Advantage ICF System interlock
that lines up the ties virtually eliminating concerns of attachments needed
for interior and exterior finishes for the customers of the Building
Stores/Dealers.
Hopefully I have touched on most of the benefits of the Advantage ICF System
in these last three blogs, whether you’re a homeowner, contractor/builder or a
building store/dealer. If you have any further questions feel free to contact
us.
Stay tuned: coming soon – how to do an uncommon corner angle on site
![]() Advantages of Advantage – Part 2
Builder/contractor
perspective
By guest writer, Doug Dyck
When I first saw the Advantage ICF System, I thought to myself what a no
brainer, it just makes sense. No plywood forms to lift, place and strip, no
form ties to insert and strip and no form oil to apply. The Advantage ICF
System is three steps in one, (forms, insulation and framing) with the
benefits of a warmer basement, faster construction time and less concrete than
a conventional foundation. The Advantage ICF System is one of the simplest ICF
systems to put together. It was designed with the contractor in mind. With
things like 1” marking lines on both sides of the block, this helps by keeping
your tape measure in your tool belt. The Advantage ICF system has a patented
tongue and groove block interlock system instead of the typical dimpled style
joint. The T&G interlock helps lock each row together and is easier to
clean out when things like dirt or snow get in the way. The T&G interlock
also forces ties (studs) to align vertically and the 1-5/8” wide flanges on
the ties make fastening finish materials much easier.
Advantages of Advantage – Part 2
Builder/contractor
perspective
By guest writer, Doug Dyck
When I first saw the Advantage ICF System, I thought to myself what a no
brainer, it just makes sense. No plywood forms to lift, place and strip, no
form ties to insert and strip and no form oil to apply. The Advantage ICF
System is three steps in one, (forms, insulation and framing) with the
benefits of a warmer basement, faster construction time and less concrete than
a conventional foundation. The Advantage ICF System is one of the simplest ICF
systems to put together. It was designed with the contractor in mind. With
things like 1” marking lines on both sides of the block, this helps by keeping
your tape measure in your tool belt. The Advantage ICF system has a patented
tongue and groove block interlock system instead of the typical dimpled style
joint. The T&G interlock helps lock each row together and is easier to
clean out when things like dirt or snow get in the way. The T&G interlock
also forces ties (studs) to align vertically and the 1-5/8” wide flanges on
the ties make fastening finish materials much easier. Advantage block was designed at 16 ½” high allowing you to achieve an 8’-3”
wall height with 6 rows of block. This will give you the typical 8’ ceiling
height after pouring your 4” slab and placing your sill plate on the top of
your ICF wall.
Jason, a contractor who has been building Advantage ICF foundations and homes
since 2005 says that he chose Advantage for the ease of installation. The 1”
marking lines on the forms make it hugely beneficial from a time saving
perspective. Another benefit of the T&G interlock design is less waste
since it allows him to use cutoffs in other parts of the foundation and to be
more efficient in constructing his foundations. He has tried other ICF’s on
occasion and has found that they usually take an extra day of install time and
that means less money in his pocket. He also appreciated that it was his local
hardware store that first suggested that he start building with the Advantage
ICF System and he could deal locally. Quoting with the Advantage ICF System
has been very easy and now that his entire crew is trained, it has allowed him
to spend less time on site and improve his profit margins. The delivery system
that is in place with the Advantage ICF System is incomparable with any other
in the industry, even during the busy season, this contractor can expect his
order to be delivered direct to his jobsite.
Les, another builder with 10 years building experience with the Advantage ICF
System, believes that the building envelope is the most important component in
a home. This builder constructs upscale and refined energy efficient homes and
is considered experts in this field. One of the benefits they enjoy is the
ties being embedded in the insulation which allows for acrylic stucco to be
directly applied without having to add EIFS to the wall.
Advantage block was designed at 16 ½” high allowing you to achieve an 8’-3”
wall height with 6 rows of block. This will give you the typical 8’ ceiling
height after pouring your 4” slab and placing your sill plate on the top of
your ICF wall.
Jason, a contractor who has been building Advantage ICF foundations and homes
since 2005 says that he chose Advantage for the ease of installation. The 1”
marking lines on the forms make it hugely beneficial from a time saving
perspective. Another benefit of the T&G interlock design is less waste
since it allows him to use cutoffs in other parts of the foundation and to be
more efficient in constructing his foundations. He has tried other ICF’s on
occasion and has found that they usually take an extra day of install time and
that means less money in his pocket. He also appreciated that it was his local
hardware store that first suggested that he start building with the Advantage
ICF System and he could deal locally. Quoting with the Advantage ICF System
has been very easy and now that his entire crew is trained, it has allowed him
to spend less time on site and improve his profit margins. The delivery system
that is in place with the Advantage ICF System is incomparable with any other
in the industry, even during the busy season, this contractor can expect his
order to be delivered direct to his jobsite.
Les, another builder with 10 years building experience with the Advantage ICF
System, believes that the building envelope is the most important component in
a home. This builder constructs upscale and refined energy efficient homes and
is considered experts in this field. One of the benefits they enjoy is the
ties being embedded in the insulation which allows for acrylic stucco to be
directly applied without having to add EIFS to the wall.
 Dave, a custom home builder, wanted to differentiate himself from other
builders. He found the Advantage ICF System at their local hardware store and
after doing their research, found all the benefits that the system offered.
They liked the energy efficient aspect, the fact that they could use less
skilled labour, letting them allocate skilled workers to more demanding tasks.
The interlock system also makes it easier for odd sized walls, which is very
common in the custom market. It allows for flexibility, and if the blocks
remain unaltered the ties correctly align, which makes it much easier to apply
the drywall or siding. The 1” inch incremental lines on the block are a great
help when constructing a wall. After the first two rows are placed you
shouldn’t need a tape measure for any cuts other than windows. You just copy
the cuts on the first two rows and if you follow the proper procedures you
should have no problems keeping the wall lengths correct. These lines save you
time on your build, and can allow for the use of less skilled labour. If they
can count, they can cut block for you. Dave likes the fact the blocks are
delivered right to his site when he wants them. The insulated ties on
advantage have two main benefits. The first is that it stops a thermal bridge
from the outside to the inside of the block. When you have an exposed tie it
allows for temperature transfers, and when building energy efficient homes
every bit counts. The second advantage is that it allows the use of acrylic
stucco to be applied directly on to the block. When you have exposed ties you
have to add a layer of EPS in order for the stucco to adhere properly. Dave
feels the Advantage ICF System is the way of the future, especially with the
new building codes about to come into effect.
As you can see, I could write a book about all of the benefits of building
with the Advantage ICF System. Not only will building with the Advantage ICF
system save the end used or homeowner money but it will save the
contractor/builder money. By reducing labour, materials and steps along the
way builders/contractors are convinced that building with ICF is the only way.
Stay tuned: coming soon – part 3 (From a building store/dealer
perspective)
Dave, a custom home builder, wanted to differentiate himself from other
builders. He found the Advantage ICF System at their local hardware store and
after doing their research, found all the benefits that the system offered.
They liked the energy efficient aspect, the fact that they could use less
skilled labour, letting them allocate skilled workers to more demanding tasks.
The interlock system also makes it easier for odd sized walls, which is very
common in the custom market. It allows for flexibility, and if the blocks
remain unaltered the ties correctly align, which makes it much easier to apply
the drywall or siding. The 1” inch incremental lines on the block are a great
help when constructing a wall. After the first two rows are placed you
shouldn’t need a tape measure for any cuts other than windows. You just copy
the cuts on the first two rows and if you follow the proper procedures you
should have no problems keeping the wall lengths correct. These lines save you
time on your build, and can allow for the use of less skilled labour. If they
can count, they can cut block for you. Dave likes the fact the blocks are
delivered right to his site when he wants them. The insulated ties on
advantage have two main benefits. The first is that it stops a thermal bridge
from the outside to the inside of the block. When you have an exposed tie it
allows for temperature transfers, and when building energy efficient homes
every bit counts. The second advantage is that it allows the use of acrylic
stucco to be applied directly on to the block. When you have exposed ties you
have to add a layer of EPS in order for the stucco to adhere properly. Dave
feels the Advantage ICF System is the way of the future, especially with the
new building codes about to come into effect.
As you can see, I could write a book about all of the benefits of building
with the Advantage ICF System. Not only will building with the Advantage ICF
system save the end used or homeowner money but it will save the
contractor/builder money. By reducing labour, materials and steps along the
way builders/contractors are convinced that building with ICF is the only way.
Stay tuned: coming soon – part 3 (From a building store/dealer
perspective)
![]() Advantage of Advantage – Part 1: Homeowners’ Perspective
Written by: Colin Showalter
Follow Colin on Twitter
@Colin_Plastifab
One of the questions I get frequently is “what is the advantage of using
Advantage ICF System?”
My answer is simple: it depends on your
perspective. Stay tuned over the next few weeks as I answer this question from
the 3 most common points of view: Homeowner, Builder/contractor and Building
store/dealer.
Today we look at the homeowners’ perspective.
The most obvious advantage to using Advantage ICF System to the home owner is
the energy efficiency of their home. Energy efficiency can be both improved
R-values and air tightness, which are both improved by using Advantage ICF
System. Typically R-12 batt insulation is used in a basement vs. the Effective
R Value 22 you get with Advantage ICF. Also because you eliminate thermal
bridging associated with cavity walls constructed with studs, batt insulation
and vapour barrier. By using ICF’s it is replaced with a two layers of rigid
EPS insulation and concrete creating a monolithic wall you greatly improve the
air tightness.
Advantage of Advantage – Part 1: Homeowners’ Perspective
Written by: Colin Showalter
Follow Colin on Twitter
@Colin_Plastifab
One of the questions I get frequently is “what is the advantage of using
Advantage ICF System?”
My answer is simple: it depends on your
perspective. Stay tuned over the next few weeks as I answer this question from
the 3 most common points of view: Homeowner, Builder/contractor and Building
store/dealer.
Today we look at the homeowners’ perspective.
The most obvious advantage to using Advantage ICF System to the home owner is
the energy efficiency of their home. Energy efficiency can be both improved
R-values and air tightness, which are both improved by using Advantage ICF
System. Typically R-12 batt insulation is used in a basement vs. the Effective
R Value 22 you get with Advantage ICF. Also because you eliminate thermal
bridging associated with cavity walls constructed with studs, batt insulation
and vapour barrier. By using ICF’s it is replaced with a two layers of rigid
EPS insulation and concrete creating a monolithic wall you greatly improve the
air tightness.
 Whether you live in windy southern Alberta, next the train tracks downtown
Montreal or under the flight path of Canada’s busiest airport a quiet living
environment is a growing concern. Building your house out of Advantage ICF
System will greatly improve the sound dampening properties of your home. The
Advantage ICF System has an STC rating of 50. This is exponentially better
than a standard 2×6 stick framed wall.
Having a house with these improved performance characteristics can also
improve your resale value. Obviously houses with these upgraded qualities are
of value to most purchasers. As energy costs increase people are willing to
pay more up front to save money every month they live in the house over the
long term.
Whether you live in windy southern Alberta, next the train tracks downtown
Montreal or under the flight path of Canada’s busiest airport a quiet living
environment is a growing concern. Building your house out of Advantage ICF
System will greatly improve the sound dampening properties of your home. The
Advantage ICF System has an STC rating of 50. This is exponentially better
than a standard 2×6 stick framed wall.
Having a house with these improved performance characteristics can also
improve your resale value. Obviously houses with these upgraded qualities are
of value to most purchasers. As energy costs increase people are willing to
pay more up front to save money every month they live in the house over the
long term.
Stay tuned: coming soon – Part 2 (From a builder/contractor perspective)
Have you signed up receive our Newsletter? If not, sign up today! http://mlgn.to/3dq
 Second option if you do your step footings at a height of 2 feet you can use
the Advantage Height Adjuster ICF block (7.5”) on top of a full standard block
(16.5”) to achieve the 24” height.
DOWELS
Rebar dowels should be placed to match the vertical reinforcement
size as per the rebar tables in the Advantage Technical Manual or the
blueprints that are engineer approved. Using 10M rebar dowels spaced at no
greater than 24” on center provides meets NBC requirements. The dowels must be
placed with a minimum of 8” embedded into the footing and 3” concrete coverage
to the bottom of the footing. Extending the dowels vertically above the
footing is required so that they can be tied into the foundation wall rebar.
If using 10M rebar, the dowels should extend a minimum of 18” vertically above
the surface of the footing and 26” vertically for 15M rebar. This will ensure
that the bottom course of your wall has sufficient lateral support from the
footing to wall connection. The diagram below further explains how to achieve
this.
Second option if you do your step footings at a height of 2 feet you can use
the Advantage Height Adjuster ICF block (7.5”) on top of a full standard block
(16.5”) to achieve the 24” height.
DOWELS
Rebar dowels should be placed to match the vertical reinforcement
size as per the rebar tables in the Advantage Technical Manual or the
blueprints that are engineer approved. Using 10M rebar dowels spaced at no
greater than 24” on center provides meets NBC requirements. The dowels must be
placed with a minimum of 8” embedded into the footing and 3” concrete coverage
to the bottom of the footing. Extending the dowels vertically above the
footing is required so that they can be tied into the foundation wall rebar.
If using 10M rebar, the dowels should extend a minimum of 18” vertically above
the surface of the footing and 26” vertically for 15M rebar. This will ensure
that the bottom course of your wall has sufficient lateral support from the
footing to wall connection. The diagram below further explains how to achieve
this.
Wall to Footing Connection Detail
For further information on this topic or any other please click on the link below or call TOLL FREE 1-888-446-5377 www.advantageicf.com Coming soon: Insulbuck How-to video by Greg Doren, Advantage Brand Manager
How-to do a T-intersection with Advantage ICFs Written by: Colin Showalter Follow Colin on twitter: @Colin_Plastifab Quite often, I get asked “why doesn’t Advantage ICF have a prefabricated or moulded T-block? And what do I do at a T-intersection when using Advantage” The answer is simple: Advantage ICF doesn’t have a T-block because fabricating a T-intersection on site is easier, faster and wastes less block resulting in lower costs compared to using a moulded T-block. Using a moulded T-block may result in more on site cutting of connecting blocks because you will have to cut filler blocks on all three sides of the T-intersection, thus creating more waste. Using a T-block doesn’t allow you to reduce your bracing requirements. Some moulded T-Blocks cost close to twice as much as the standard blocks based on cost per square foot. So how do you do a T-intersection with Advantage ICF? Follow the steps below and you will reduce your construction cost including the waste and labour at T-intersections. Preparation: Build strong back “L’s” out of dimensional lumber as required. And pre-bend two 90 degree pieces of rebar per row of blocks. Step 1: Working from corners to the middle of wall, build the through wall as you would normally,. Step 2: Cut the foam out of the through wall you just built in order to fit in the perpendicular wall. Your cut opening will be 11 ¼” wide for a 6” block and 13 ¼” wide for 8” block. Cut the Advantage web in the wall section you have cut at the third rebar clip from the side where you have cut the foam, leaving the middle vertical strut in the web. Now remove the foam cut out. This will allow you to slide the perpendicular block into the through wall. Use two zip straps approximately 20 inches long and run them through the perpendicular block web around the middle strut of the cut web. Note: Do not over tighten straps. Step 3: Place pre-bent 90 degree rebar going all three directions in the “T”. For further explanation of steps 2 & 3, see the graphic here.
 Step 4:
Repeat steps 2 and 3 for all sequential rows of ICF block.
Step 5:
Take your pre-built lumber “L’s” or “strong backs” place these
vertically on the inside 90 degree angles of the “T” fastening them to the
Advantage ICF ties. Fasten every row.
Step 6:
Fasten a brace the same as the rest of your braces directly on
the back side of the T-intersection to support the block to resist the high
concrete pressure at the T-intersection.
Following these steps will allow you to build a monolithic concrete wall at
any T-intersections in your project. Be sure to follow all local building
codes.
You can learn more about Advantage ICF details on the website
www.advantageicf.com
Coming soon: Better footing, better results! Guest writer Wade
McClelland
________________________________
Step 4:
Repeat steps 2 and 3 for all sequential rows of ICF block.
Step 5:
Take your pre-built lumber “L’s” or “strong backs” place these
vertically on the inside 90 degree angles of the “T” fastening them to the
Advantage ICF ties. Fasten every row.
Step 6:
Fasten a brace the same as the rest of your braces directly on
the back side of the T-intersection to support the block to resist the high
concrete pressure at the T-intersection.
Following these steps will allow you to build a monolithic concrete wall at
any T-intersections in your project. Be sure to follow all local building
codes.
You can learn more about Advantage ICF details on the website
www.advantageicf.com
Coming soon: Better footing, better results! Guest writer Wade
McClelland
________________________________
Rebar in ICF Walls
Written by Colin Showalter – Follow me on Twitter @Colin_Plastifab Frequently, I get asked what do I need for Rebar in my ICF walls? What sizes and how often? Compared to conventional foundation walls ICF’s require more rebar. However you can have a 6” thick concrete wall with ICF opposed to an 8” conventional foundation wall in most cases. Therefore the extra rebar can save you 2” of concrete throughout your foundation walls. Since ICF’s incorporate more rebar and are considered reinforced concrete walls, they will allow you to build a taller wall giving you a higher ceiling height compared to conventional concrete walls. Rebar is used to solve structural design requirements related primarily to
compression, tension and shear loads. Rebar will also control concrete
shrinkage cracks.
Concrete is strong under compression loads, but tensile strength is much
lower. Rebar for below grade foundation walls with backfill on the
exterior face is always installed in the inside third of the wall which is the
tension side of the wall. For above grade or Party Wall applications the rebar
is typically placed in the middle of the wall.
When you look in the Advantage ICF block you will see rebar clips on the
plastic webs that space the 2 layers of EPS. For below grade ICF Walls install
your horizontal rebar in clip #1 on the first row of block and #3 on the
second row and alternating between #1 and #3 for all the sub sequential
courses of block. Staggering the rebar from row to row creates a “weave”
effect that enables the horizontal rebar to cage (another term “hold) works
also)your vertical rebar in place. Vertical rebar is installed once the wall
is at full height.
Jobsite tips for rebar:
Rebar is used to solve structural design requirements related primarily to
compression, tension and shear loads. Rebar will also control concrete
shrinkage cracks.
Concrete is strong under compression loads, but tensile strength is much
lower. Rebar for below grade foundation walls with backfill on the
exterior face is always installed in the inside third of the wall which is the
tension side of the wall. For above grade or Party Wall applications the rebar
is typically placed in the middle of the wall.
When you look in the Advantage ICF block you will see rebar clips on the
plastic webs that space the 2 layers of EPS. For below grade ICF Walls install
your horizontal rebar in clip #1 on the first row of block and #3 on the
second row and alternating between #1 and #3 for all the sub sequential
courses of block. Staggering the rebar from row to row creates a “weave”
effect that enables the horizontal rebar to cage (another term “hold) works
also)your vertical rebar in place. Vertical rebar is installed once the wall
is at full height.
Jobsite tips for rebar:
- Make sure you know where on the jobsite you want the rebar unloaded.
- Keep the rebar as clean as possible from dirt and other contamination as this will affect the performance
- Have a proper rebar cutter and bender on site or arrange to have this done for you prior to having the rebar delivered to achieve required tolerances.
- Cut 4 foot lengths and pre-bend them for corners and T-Walls
- Place plastic caps over the top of vertical rebar sticking out of footings or walls to prevent injury from sharp ends .
Insulbuck is a fully insulated window/door buck system designed to complete the energy efficient envelope of an ICF structure. Created as an alternative to wood and all vinyl buck systems, Insulbuck is:
 — Easy to assemble
— Cost effective
— Maximizes potential LEED
points due to
maximized energy efficiency and virtually
zero
construction waste
— Can be adapted to any size of ICF
— Easy to assemble
— Cost effective
— Maximizes potential LEED
points due to
maximized energy efficiency and virtually
zero
construction waste
— Can be adapted to any size of ICF
Download the Brochure View some photos from a project that used InsulBuck
InsulBuck or Wood?
Written by guest writer Greg Doren, Advantage ICF Brand Manager Follow Greg on twitter @GregDoren Rough opening bucks in ICF construction have typically been constructed using a lumber frame to form an opening in which a window or door will be placed. The bottom portion of the buck is designed to allow concrete to be poured through it into the blocks that sit below it. In the final construction the buck also creates an attachment point for windows and door frames. “Bucks” have typically been made from Pressure Treated Wood (PTW) dimensional lumber. Commonly used in construction for many years PTW has been the product of choice for ICF construction since it is readily available and easy to use. It comes in a variety of dimensions and can be ripped down or furred out to accommodate different widths of ICF products. The attachment of the window or door to the buck is done with a common fastening screw. The drawbacks to PTW bucks are that they are heavy, have minimal R-Value (critical for LEED points), are subject to warping, rot and are a food source in termite infested areas. InsulBuck™ is a vinyl/EPS alternative to PTW bucks for building window and door bucks in ICF construction. InsulBuck consists of two exterior extrusions of vinyl, which are also used for the fastening of the windows and doors, bridged by 2 inches of high density Type 3 expanded polystyrene (EPS) insulation planking. InsulBuck is cost effective, easy to use and the continuous EPS layer around the opening eliminates the thermal break typically created by PTW bucks. The most impressive benefit with InsulBuck is that it is a ZERO waste product. With PTW the cut off pieces associated with accommodating window and door size are thrown into landfills, increasing costs as well as waste. InsulBuck extrusions and planking come in 8 foot lengths; when they are cut to length to accommodate window and door sizes the leftover pieces can be used in another buck by simply splicing them in. Short pieces of extrusion can be used with longer pieces of EPS insulation planking and vice versa. This cuts down on waste critical for the bottom line. Other key components to assemble InsulBucks are “F” Clips and “InsulPlates”. The “F” clips hold the corners together where the EPS planks meet. The InsulPlates are metal inserts used on doors and larger windows. These inserts go through the EPS planks near the exterior or interior and are anchored into the concrete before it is placed. The doors are fastened to the plates to allow for the pressures and movement associated with opening and closing the door. Ripped down plywood is used to help brace PTW bucks around the perimeter to keep them square and prevent concrete from leaking out. InsulBuck extrusions are designed so they are attached to the ICF Block so which this does not allow the buck to move. An extruded lip on the InsulBuck allows bonding between the concrete and buck, whereas PTW bucks need to be “porcupined” with nails around the outside middle of the buck. Both PTW and InsulBuck require cross and angle bracing to keep them square and to keep them from bulging when concrete is placed, especially larger openings. InsulBuck is an vinyl/EPS buck for an ICF project, it maintains the energy efficiency that an ICF wall is intended to provide, which is simply something that PTW cannot accomplish. InsulBuck is economical and an effective approach to creating block-outs in ICF walls and will enhance any ICF project. Download the InsulBuck Brochure for more information and photos! _______________________________________________________________________________________
 What do you do when you don’t want to use conventional ledger angle methods
when using ICF’s?
EASY… use an Advantage ICF Brick Ledge Block!
Advantage ICF brick ledge blocks are unique in that they are the only ICF
brick ledge blocks designed as a corbel to provide a continuous 4” wide
reinforced concrete ledge to support exterior brick/masonry finishes, floor
systems & decks, read on.
When you use the Advantage ICF Brick Ledge the rebar is totally encapsulated
in the concrete and there is no chance of oxidation where EPS voids are
present. No EPS insulation voids also means less waste when corners are
mitered. In some cases, the Advantage ICF brick ledge block can also be
reversed to support interior floor, roof systems and slab support. These
specially molded blocks are placed at the specified wall height or heights to
create a monolithic concrete supporting ledge. Once the proper stirrups/ rebar
are placed and the blocks are braced and you are ready to place concrete.
What do you do when you don’t want to use conventional ledger angle methods
when using ICF’s?
EASY… use an Advantage ICF Brick Ledge Block!
Advantage ICF brick ledge blocks are unique in that they are the only ICF
brick ledge blocks designed as a corbel to provide a continuous 4” wide
reinforced concrete ledge to support exterior brick/masonry finishes, floor
systems & decks, read on.
When you use the Advantage ICF Brick Ledge the rebar is totally encapsulated
in the concrete and there is no chance of oxidation where EPS voids are
present. No EPS insulation voids also means less waste when corners are
mitered. In some cases, the Advantage ICF brick ledge block can also be
reversed to support interior floor, roof systems and slab support. These
specially molded blocks are placed at the specified wall height or heights to
create a monolithic concrete supporting ledge. Once the proper stirrups/ rebar
are placed and the blocks are braced and you are ready to place concrete.
 ICF Brick ledge blocks are commonly used to support brick and stone exterior
finishes. They can also be used to support hollow core precast concrete panels
for suspended garage floors and commercial buildings. An increasing number of
trained contractors are using these blocks to support floor systems. Using a
brick ledge block instead of supporting the floor system on top of ICF walls
with an exterior rim board will greatly increase the effective R-value of the
wall system.
Typically brick ledge blocks are at the top of the wall section that you are
pouring but they can be capped off with dimensional lumber if you wish to
continue higher and pour all at once. Special consideration must be taken when
pouring walls above the Brick ledge block elevation to ensure concrete doesn’t
overflow the 4” gap at the brick ledge block elevation that creates the
support.
Here is How to finish the Advantage ICF brick ledge blocks. The use of top
cord bearing trusses incorporated into the design will “hide” the corbel
detail in the webbing space. Some contractors and home owners will build a
bulkhead or drop ceiling to run utilities under the corbel or they attach
drywall matching the profile to create a unique detail similar to a crown
molding.
Advantage ICF brick ledge blocks are rapidly becoming the ledger system of
choice.
For more information on Brick Ledge, visit
http://www.advantageicf.com
ICF Brick ledge blocks are commonly used to support brick and stone exterior
finishes. They can also be used to support hollow core precast concrete panels
for suspended garage floors and commercial buildings. An increasing number of
trained contractors are using these blocks to support floor systems. Using a
brick ledge block instead of supporting the floor system on top of ICF walls
with an exterior rim board will greatly increase the effective R-value of the
wall system.
Typically brick ledge blocks are at the top of the wall section that you are
pouring but they can be capped off with dimensional lumber if you wish to
continue higher and pour all at once. Special consideration must be taken when
pouring walls above the Brick ledge block elevation to ensure concrete doesn’t
overflow the 4” gap at the brick ledge block elevation that creates the
support.
Here is How to finish the Advantage ICF brick ledge blocks. The use of top
cord bearing trusses incorporated into the design will “hide” the corbel
detail in the webbing space. Some contractors and home owners will build a
bulkhead or drop ceiling to run utilities under the corbel or they attach
drywall matching the profile to create a unique detail similar to a crown
molding.
Advantage ICF brick ledge blocks are rapidly becoming the ledger system of
choice.
For more information on Brick Ledge, visit
http://www.advantageicf.com
 Coming soon: InsulBuck vs. Wood, for window and door bucks written by
guest a
uthor Greg Doren.
Coming soon: InsulBuck vs. Wood, for window and door bucks written by
guest a
uthor Greg Doren.

My brother suggested I would possibly like this blog. He was once entirely right.
This put up truly made my day. You cann’t consider just how much time I had spent for this information! Thanks!
Hi to all, it’s truly a nice for me to pay a visit this web site, it consists of helpful Information.
That is a really good tip particularly to those fresh
to the blogosphere. Simple but very precise info… Thanks
for sharing this one. A must read article!
hi, just a question??????????
what does a multi-strap look like?
Thank you for your inquiry about our Multistrap. I have supplied an image here of what one of our multistraps looks like .

I’m really loving the theme/design of your blog. Do you ever run into
any web browser compatibility problems? A handful of my blog audience have
complained about my blog not working correctly in Explorer but looks great in Firefox.
Do you have any recommendations to help fix this issue?
Marvelous, what a blog it is! This weblog presents helpful facts to us, keep it up.
Having read this I believed it was extremely enlightening.
I appreciate you spending some time and energy to put this content together.
I once again find myself personally spending way too
much time both reading and posting comments. But so what,
it was still worthwhile!
Very well presented.. Thanks for sharing this with us.
My fiancé and I are just starting to have a home built. We are going to have the ICF walls for basement. My question is….. The contractor poured our footers couple weeks ago. He didn’t put rebar in footers. The contactor said wasn’t necessary. So when placing the ICF walls on the footers, will they eventually shift since nothing really locking them together…. Just concrete against concrete.
We definitely recommend you check with the local code officials. Typically rebar is required every 2 feet, sticking out 2 feet. You can hilti, & epoxy them in with a hammer drill. There should be a key way in the footer as well. This is where we require rebar as do most ICFs in the footer.